A follow up on Digitising by Master Nick Hutton. Hopefully those ofyou who typed in the Digitiser listing in the May edition of ACU will now have fully debugged , working copies secreted amongst your Disk collection. You should now be familiar with the listing's operation and eager to utilise it's output in your own programs. In it's current form it is not the easiest little subroutine to add to your programming masterpiece. The first step to using the program in your own listing is to get it into a neat and more memory efficient form, a Binary file, (gasp of horror). To accomplish this mind blowingly d ifficult operation you must first have a completely bug free, fumigated program, & la ACU May. Run the Digitiser program as it appears in the magazine, we now need to get into BASIC by pressing ESCAPE twice, not by selecting option five on the Menu, dummy. Next, just enter the following short linesof BASIC, making sure you have a Disc with a couple of K free in the built in pop up toaster. (That reads Disc Drive for those with a limited sense of humour). SAVE "DIGICODE.BIN”,B,&A0OO,&208Finished already? You should now have a Binary file on Disc of approximately 1K in length, if not, consult your Bank Manager or Local M.P. The program is now in a much more portable form.To incorporate it in your latest moneyspinner just add the following lines at the start of your program which form a short loader. 10 H=HIMEM
20 IF H=36863 THEN 60 ELSE 30
30 MEMORY &9FFF
40 LOAD “DIGICODE.BIN",&A000
50 CALL &A000
60 MEMORY “Start address minus 1”
70 LOAD “SOUND.BIN", start address, length
80 REM Start of your ProgramThe loader incorporates a short routine which makes sure that the Digitiser is not loaded-in more than once, which means that every time you alter your program and then run it, you won't have to wait for the Binary file to load again. (We don't neglect Tape users here at Amstrad Computer User).Line 70 will load in the sample you have recorded previously with the Digitiser. You should amend the details of this line, eg: file name, start address and length, to suit your own sample, which should be saved on Disk or Tape. You must also change line 60 to reserve the correct amount of memory for your sample. For example if my sample started at &2000 the statement in line 609 should read: MEMORY &1FFF (We can't all count in Hexidecimal). With patience, and more than a bit of luck, both the Digitiser code and your sample should be safely in the computer's memory and ready for playing. To play a sample you must enter the RSX instructions into the desired lines of your program, no more friendly menu I'm afraid.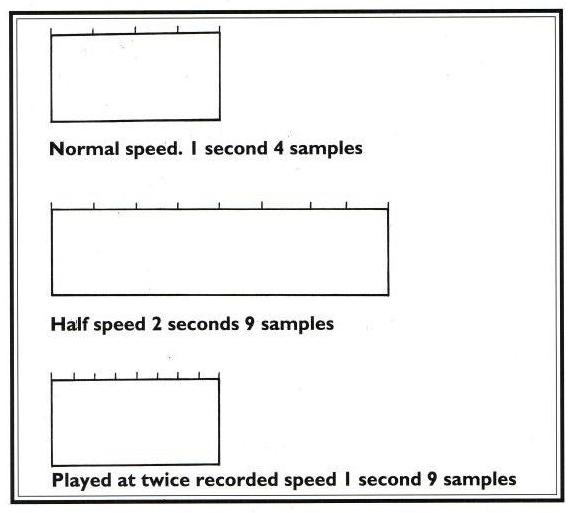 Playing a sample is really very simple if you can remember the start and end addresses. The following line will play your sample. |PSOUND, START ADDRESS, END ADDRESS, VOLUMEOnce again please amend the line to suit your sample's details. It is of course possible to record sound from within your program in a similar manner using the RSX |RECORD.As soon as the RSX has been issued with the correct parameters, and your sample has been played, command will be returned to your own basic program and the next instruction will be carried out. At this point I feel that I must remind you that you shouldn't sample a sound from say, a music cassette, without first seeking permission of the copyright holders for that piece of music. (I won't tell if you won't). I expect that many of you are wondering why your samples are not as clear as those on say, Chase HQ or Shinobi. Well, the secret to a clear sample is all in the speed of data sampling and bits per second. The trick is to cram as many sampled bits as possible into each piece of analogue sound. The more pieces of sound the com-putertakes in the smoother the sample. Your samples sound rather harsh because the computer does not take in every single piece of data on your audio tape, it only remembers an evenly spread section of sound, hence the somewhat crackly nature of playback. So what we need is to find some way of squeezing more data into each sound the computer reads. After some careful thought I deduced that there was a way of increasing the perceived sampling rate and so clarifying the digitised sound. Before 1 continue, 1 should explain that the following procedure for digitising sound will only work on First Bytes Digitiser as the listing in the May issue of ACU doesn't have all the required functions. (Whaddya expect for 1K of code?) Firstly, we must slow the analogue sound down to half speed, your cassette recorder may have a half speed setting. Make sure your sound is at half speed before sampling it in. Then set the recording speed option to normal speed, and record your sample. Next, once your sample is in memory, select the playback speed setting and set it to twice normal speed. When your sound is played back it should be much clearer. This is because it contains twice as much digital data as the original sample and is therefore twice as clear, theoretically. (The diagrams should help explain the mechanics of the operation) It is also theoretically possible to keep on slowing down the speed of the analogue data “ad infinitum" but a “half speed ratio" should be quite sufficient for your purposes. And on that last note I conclude my little expedition into the outwardly baffling subject of digitising. ACU | Cramming in the data Each red dot represents a sampled bit of data. The length of each rectangle is proportional to the length of analogue tape that the sound would take up and therefore the overall amount of time it takes for the sample to play. Closer examination of the process reveals that it is possible to cram in twice the sampled data or bits, into a sample of the same perceived length as a sound of normal speed. This means that the sample uses twice as much memory as a normal one, the only drawback. |
| 


