


★ APPLICATIONS ★ PROGRAMMATION ★ MegaMon ★ |
| Megamon (Your Computer) | Applications Programmation |
Laurie Sinnett's monitor takes you places you've no right to see in your Amstrad. Megamon is a sophisticated disassembler monitor which will work on the complete range of Amstrad machines. Among its many features are an intelligent move memory facility, control over the lower ROM state, machine code trace, read or write object code to tape or disc, full memory dump to the printer, and a disassembly that will even understand all of the 102 undocumented Z-80 instructions. All of the controls are accessed through single key-presses so Megamon is easy to understand and simple to use. Listing I is the short loader program for Megamon. Type this in and save it as the first thing on your tape as "MEGAMON". Listing 2 is the standard hex-loader program which pokes in the hex code from DATA statements. When all the bytes have been successfully entered then the loader program will prompt you to hit any key when ready to save the code. Ensure your tape is positioned after the megamon Basic loader.
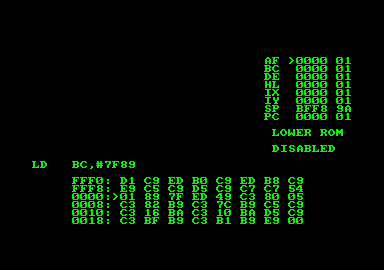
To run the program rewind the tape and type RUN "MEGAMON" When the program has loaded the little screen will appear and you will be asked for an address at which to load Megamon. this can be any address from 4000H up to 9000H. Obviously the monitor will not work if loaded underneath the lower ROM. Once the address has been entered the object code for Megamon is loaded and you will be presented with Megamon's Front Panel screen display: Z80 Registers — The top right of the screen shows the Z80 registers AF,BC,DE,HL,IX,IY together with the stack pointer (SP) and the program counter (PC). The register contents are shown (at start-up these are always zero) and then the contents of the memory location addressed by that register, there is also the register cursor (","), which points to AF on start-up. It's use will be discussed shortly. Lower ROM State — Below the register display the state of the lower ROM is shown, either Enabled or Disabled. Memory Display — The memory display occupies the bottom of the screen and its purpose is to display the bytes around the memory pointer, indicated by ,. The bytes can be displayed either as hex or as ascii. PC Instruction — The instruction at the Program Counter is contantly displayed above and to the left of the Memory Display. List Display — The left of the screen above the Memory Display is taken up by the List Display. At start-up this display will be blank, but if you are eager to see it in action then for the moment press L followed by a full-stop. You will see the 14 instructions from address zero disassembled for your perusal. Unfortunately, space does not permit a detailed discussion of the undocumented instructions, needless to say their use is becoming much more frequent in may of today's top games. Disassemblers that can cope with them are rare and the format for displaying them varies. For example, look at the instruction: ADD A,IXL This means "Add A to the low-byte of IX, the "L" tagged on to indicate the low-byte. Alternatively, you can use. ADD A.IXH This means 'Add A to the high bye of IXi.e. add A to I. Megamon would display the two instructions above as follows: i) ADD A,IX ii) ADD A,IX The letter in capitals indicates which byte of the register pair is being operated upon. The same applies to all undocumented instructions that use the IY register pair. There now follows a list of the Megamon keys and a full explanation of their usage. The Four Cursor Keys: The four cursor keys above the function pad are used to move the Memory Pointer ">" within the Memory Display in the appropriate direction, enabling you to step up or down through the memory, in steps of one or eight bytes at a time. The Full Stop Key: Pressing the full stop will advance the Register Cursor >' onto the next register pair in the Register Display. B — Return to Basic: Pressing this key will produce the prompt "Are you Sure?", In response to this press "Y" if you wish to leave Megamon and return to Basic. Any other key press will return you back to Megamon itself. When Megamon returns to Basic it restores the Roms to whatever they were at start-up. C — Clear List Window: The List Window can be cleared at any time by pressing the "C" key. D — Display Memory: This allows you to change the address around which the Memory Display works. You will be asked for a new address for the Memory Prointer — this must be entered as a hex number teminated by a Return. If, instead of a hex number, you press the full stop key then the Memory Pointer will be set to whatever address the Program Counter currently holds. The address is displayed, along with its contents. You can either enter a new hex number for this location or press Esc to exit the memory change. When a new number is entered the memory pointer is advanced to the next location and your options are the same again. At any time during the input of a number you can press the Esc key to abort and leave the Memory Pointer unchanged. E — Toggle Lower ROM State: Press the "E" key and the Lower ROM will be toggled between I Enabled and Disabled. F — Fill Memory: The prompt "Fill>" appears and the number entered here will be the start address for the program to use. You are then asked for the address at which the program will end its fill, and finally the byte to fill the memory with. For example, if you enter 8000 in reponse to "Fill >", 8100 in response to "To >", and FF in response to "With >", the memory between 8000 hex and 8100 hex will be filled with FF (255 decimal). G — Go: This allows you to execute the object code currently under examination with the use of 'breakpoints, i.e., places at which the object code is stopped in its tracks and control returned to the monitor for you to examine the registers etc. The address which you enter is response to 'Go>' will be the address at which the monitor starts execution of the object code. As usual with all prompts, if you press the Esc key then the operation will be aborted. You are then asked for an address — "To >" — at which control will be returned to Megamon i.e. the address at which you wish your breakpoint to be inserted. When you have entered this address Megamon will go off and execute the code. When the breakpoint has been reached, assuming that the code has not caused a fatal crash, a small line will be displayed on the screen and this means that Megamon is wating for you to press any key before updating all of its displays. H — Search For String: The prompt "Search For ">" is displayed. You can now enter a sequence of up to 255 bytes which will form the string which Megamon will search for. Each number should be entered by pressing Return and by pressing Return on its own you will terminate the string. At this stage, assuming the sting can be found, Megamon will update the Memory Display and the Memory Pointer > will be pointing to the second byte of the input string. Also see the explanation of the next instruction, "A". A — Find Next Occurence: Pressing the "A" key will tell Megamon to find the next occurence of a string you have searched for using H. t, / — Toggle between Ascii and Hex: By pressing the "I" key you can toggle the Memory Display Memory so that it shows either Hex or the Ascii equivalents. L — List: You can enter a new address from which the disassembler will list its 14 instructions. However, there are two other alternatives to entering a new address. If you press the full-stop key in response to List> then the disassembly will begin from the address currently held in the Program Counter. Alternatively you can press Return in response to the prompt and the disassembly will continue from where it left off. M — Move a Block of Memory: The prompt move > will be displayed and the address you enter will be the start of the memory block you wish to move, The prompt "End. asks you for the end address of the memory block and the prompt "To >" asks you for the destination address for this block. The routine is "intelligent" so that if your destination address lies within the limits of the block you wish to move Megamon takes this into account and performs the move correctly. O — Read Object Code: This reads a block of object code from in from tape or disc, depending on which system is in use. You are prompted to enter a filename and then an address at which the code will be loaded. Needless to say, you should take care not to overwrite Megamon. P — Printer Disassembly: With this option yon can produce a disassembly of any length to your printer, you could even list the Amstrad ROM. Then first address you enter, in response to "Print." , is the start address for the disassembly, and the second address is the end. Assuming the printer is connected a disassembly will now appear on the printer which can be aborted at any time by pressing the Esc key. R — Change Register : By pressing the "R" key you can change the value of the register pair currently pointed to by the register cursor >,. The register pair will take on the value you enter at the keyboard. S — Single Step: Megamon will execute the current instruction at the Program Counter when you press the "S" key, allowing you to examine the effects of the code upon the registers and memory. This function will aslo single-step through a Call instruction. T — Trace: If you press the "T" key Megamon will execute the instruction at the Program Counter in the same way as the "S" function above, except that using "T" allows you to execute a Call instruction automatically. W — Write Object Code: This writes a block of code to tape or disc under a given filename. You are prompted to enter the filename and then the first and last (inclusive) addresses of the block you wish to write. X — Toggle Alternative Registers: Pressing the "X" key will toggle the Register Display between AF,BC,DE, HL and the alternate registers AF' , BC' ,DE' , HL' You are advised to leave the values in the alternate register set unchanged as these are in constant use by the firmware (for further details see the Amstrad Firmware Specification — Soft 158, Appendix XI). If the sight of all those hex bytes is enough to put you off then copies of Megamon, recorded on quality blank tapes, are available a cost of £3.50 each, including postage, from Laurie Sinnett
|


