


| ★ APPLICATIONS ★ PAO/PRESSE ★ MICRO DESIGN/MICRODESIGN ★ |
| MICRO DESIGN (Amstrad Cent Pour Cent) | MICRO DESIGN/MICRODESIGN (Amstrad Computer User) | MICRO DESIGN (Amstrad Action) |
Jill Lawson finds that a cross between a desktop publishing package and an art utility can add sparkle to hard copy SOME time back in the autumn of 1985 Simon Hargreaves won first prize of £1,500 in Artisoft's software competition for a program known as Micro-Draft. Primarily this was a Mode 2 utility for constructing circuit diagrams using a series of purpose designed manipulatable icons, designed on a choice of either 16 x 16 or 24 x 24 (Mode 1 style) grids, in addition to the more common (line, box, circle, and so on) drawing tools. Although usable for designing anything up to a full A4 page, it is not intended to be a DTP package. Some suggested alternative applications are shown in the printouts at the back of the accompanying manual and the dozen or more demo drawings on the disc - cassette labels, maps, diagrams, greeting cards, hand bills, letter heads, crosswords and the like. Documentation The 12-page manual with the evaluation copy was simple to understand, with clear instructions on how to perform each function. A couple of hours playing around with the program should be sufficient to get you started.
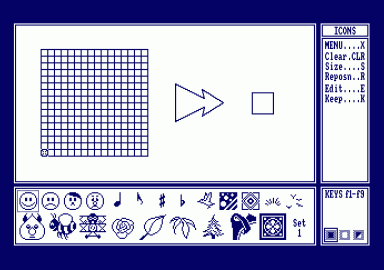
For wallies tike me, perhaps the author would consider including the following short program needed for use with the CONVERT facility, which allows files from popular art packages such as Screen Designer and Advanced Art Studio to be loaded into MicroDesign. MODE 1/2:LOAD"pic",&C000:WHILE INKEYS="":WEND:|CONVERT,"pic.DR" The layout page is presented in white on a dark blue background. Since the manual refers to black and white throughout, and printouts will usually be Iikewise, you might prefer to turn down your brightness control to change the blue A panel to the left of the screen shows the shape of the current page (initially A4 upright). On the right of there is a menu which allows you to erform functions on the layout page, such as new, Which clears the screen and enables you to change the shape of the drawing area to A4 sideways, or to a strip format (more of the latter later), and block, with which you can define an area which can subsequently be erased, moved or copied . From the menu you can select one of the other pages (design, printing fiiing or icon editing), or click on design to take you directly to the drawing page. Although AMX mouse-compatible, speedy operation is possible from the keyboard, including the cursor keys numeric key pad. I was using a converted CPC 464 , and expect that combinations I found a little awkward will be more comfortable on the CPC 6128. Design The design page zooms in to a pre-selected area of the layout page to perform the drawing functions. Points/freehand drawing is possible in thee sizes/widths using the cursors keys and spacebar, and solid or dotted lines and angles may be drawn. Using a variety of combinations of the numeric keys, there is a sophisticated facility to construct circles, rectangles, triangles, ovals and diamonds in outline, solid, or filled with any pattern from the icon table. On this page blocks can be erased, moved or copied, and they can also be stored and glued down as many times as required anywhere on the drawing. Mirror in each direction may only be performed within the store/glue option. Write allows small text, in four sizes/styles, to be typed in direct from the keyboard in a choice of four directions. Drawing functions use Mode 1 size pixels, but with zoom, a small area is magnified further for editing with either full size, or half size (Mode 2) pixels. The Escape key will abort an operation, the screen can be centred, the cursor can be centred, the last operation can be repeated, and the design area can be scrolled in any direction. The f0 key is the do key, fixing the last performed action, and pressing the [.] key will Undo the last f0. Across the lower part of the design screen a removable panel is used to display one of three pages of icons. The 13 on the top row are based on a 16 x 16 square pixel grid, the nine on the bottom row on a 24 x 24 grid. Sets of icons, provided on the disc, give a selection of motifs, a variety of shade, texture and pattern fills, and assorted elements for circuit diaqrams. Choosing icon from the design screen menu picks up a copy of the currently selected one, which can then be moved around the design area and planted accurately where it is required. Any of the icons may be rotated, mirrored or inverted and may be opaque, transparent or xor (swapping black and white inks where the icon and background overlap). The icons are a pleasure to use and altogether their smooth movement, speed, and ease of positioning is most impressive. Selecting icons from the main menu accesses the icon editing page where any or all of the icons may be redesigned. They may be saved either as separate pages or as a complete set. There are several icon files on the disc containing complete fonts of display text which you can enter from the keyboard if you wish. Memory saving Should you decide to design your own fonts, the keyboard entry will only work if characters are designed in the same relative positions. Saving (and loading) icons, a full size drawing, or a predetermined area of a drawing is done via the Filing page. Picture data is stored in compressed form. When part of a drawing is reloaded its position can be adjusted on the layout screen to enable several small pictures to be assembled on one page. Mode 2 drawings, drawn with other design packages, can be loaded in easily with the CONVERT facility. If you have Mode 1 drawings these, too, can be converted, but usually it will be necessary to do a little re-drawing first, replacing some coloured areas with stipples so that definition is maintained. This gives very satisfactory results and will often be much quicker than starting again from scratch. The printing page offers a selection of options for outputing to an IBM or Epson-compatible dot matrix printer. Each of the A4 formats may be printed at full, half or quarter size. The strip format, mentioned earlier, can be printed only at full size {approximately one third of an A4 sheet) or at half size. Resolution is exceptionally good where strips are used, and, without form feed between, three or four can be linked to produce a high quality full page printout. A 'one-pin' printing option gives extra accuracy to printouts (provided you are not pushed for time) and you can choose single or double pass printing, with the latter being handy if your ribbon is worn. I have already used the program to produce the mastercopy of a handbill for subsequent photocopying, and to design the layout of a business card, and foresee a host of other uses for it in the future. The Eiffel Tower on the facing page was drawn originally as four separate screens with Screen Designer Mode 1, in black and white only. These were each loaded into, and rotated within Art Studio. It was necessary to deal with the broad base in two stages. Converted files were used with the strip format. Because the base would not fit into one strip, the missing bit was drawn on a second strip, and by printing that one immediately after the other, with the form feed turned off, it was possible to concatenate the two strips to make a complete drawing. Conclusion MicroDesign is for those who are primarily concerned with producing high quality printed material rather than for the on-screen artist The program has a lot of features, all of which seem to perform most efficiently. The manual is exceptionally easy to understand and all functions are described clearly and simply. Although not suitable if you are looking for an all-purpose art utility, MicroDesign would make an excellent companion to a more conventional drawing package. MicroDesign is available from Siren Software for £24.99, or with a mouse and interface for £64.99. ACU #8805 |
|  |


