


| ★ APPLICATIONS ★ CREATION GRAPHIQUE ★ THE OCP ART STUDIO ★ |
| THE OCP ART STUDIO (Hebdogiciel) | THE OCP ART STUDIO (Amstrad Action) | THE OCP ART STUDIO (Amstrad Computer User) | THE OCP ART STUDIO (The Amstrad User) | THE OCP ART STUDIO (CPC Magazin) |
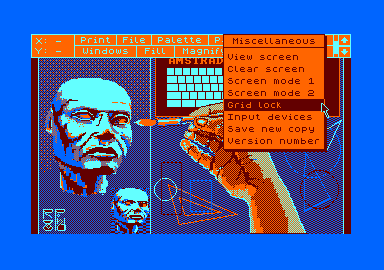
If you want to buy an art package for your Arnold, you'll find you're spoilt for choice. Under the circumstances any new system needs to be something really special if it's going to survive. Rainbird has just released Art Studio for the 6128 and special is certainly the word for it. Two things struck me immediately about the package: first that it works only in Arnold's two- or four-colour modes (modes 1 and 2) rather than the more normal multi-colour mode 0. and second that it is strongly inspired by the Apple Macintosh and similar WIMP (Window, Icon. Mouse. Pull-down menu) systems. How you feel about the first of these is very much a matter of taste - I can t say I miss mode 0 myself, but it does seem an odd omission. As for Art Studio being WIMP-inspired, that's pretty common these days. The difference here is that where most packages aim to look like the Macintosh, Art Studio sets out to perform like it - and to a considerable extent it succeeds. PROTECTION The first thing you'll notice about the system is the Lenslok protection it uses. I've had my rant in the past about honest users being saddled with cumbersome protection systems, ana I d certainly call Lenslok cumbersome but in this case there is a reason for it. Rainbird doesn't try to stop you from making copies of Art Studio-, in fact, the publisher helps you. There's a feature which allows you to save a customised'version of the program to disk, so normal copy-protection is clearly not going to work. Given that the program is easily usable without the manual. Lenslok is the only alternative to actually trusting people. SELECTING PULL-DOWNS Once you've got past the protection system to the program itself, you're presented with the usual blank screen. There's a senes ol opt.ons runs across the top of the screen, and a small 'arrow' pointer. You can move the pointer around using cursor keys, joystick, or even a mouse if you're lucky enough to have one. To select one of the options just move the pointer to it and press select'. (That's the space bar on the keyboard or the fire button on the joystick.) Selecting an option produces a pulldown menu a list of further options which overlays part of the screen like a roller wmdowblmd. Choosing one of the options on a pull-down works the same way: move the pointer to it, press 'select' and there you are. PAINTING AND SHAPES The first options you're likely to be interested in are Paint and Shapes. Between them these offer you all the main features you'll need to create your pictures. The Paint pull-down provides the three main tools - pen, brush and spraycan in a variety of different shapes and sizes. On selecting pen, for example, you'll get another pull-down panel demonstrating the sixteen different shapes of pen available. Just move the pointer to the appropriate shape, press 'select' and you're in pen mode. Move the pointer onto the drawing area and it turns from a little arrow to a little pencil. Hold 'select' down, move this pencil pointer and you'll draw a line. The brush and spraycan options work in the same way. but with brush- and spray can-shaped pointers instead of the little pencil shape. These different-shaped pointers are meant to remind you which drawing or painting mode you're in, and like pull downs they make the program very easy to learn without the use of the manual. Although the available ranges of pen shapes and spray patterns are both fixed, you can alter the selection of brushes to suit your needs using the edit brush option on the Paint pulldown. Choosing this option gives you a brush-editing menu where you can alter the pattern of dots that forms each brush. This comes in two stages, the data and the mask. Put simply, the mask defines how much of the background the brush wipes out and the data defines how much new colour the brush applies. The Shapes pull-down allows you to 'rubber-band'straight lines, triangles and rectangles. You can also draw circles and plot individual points.
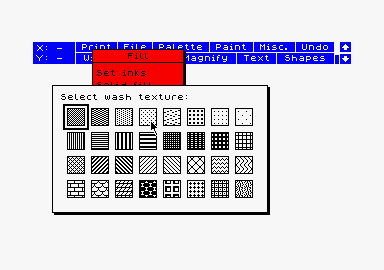
FILL AND UNDO Once you've created a drawing with Paint and Shape you can flesh it out a bit with the different options from the Fill pulldown. There are two main types of fill available: solid and over. Solid fill works on an area of one colour and stops at the edges of that area. With overfill you outline an area with (say) blue ana any colour inside is changed to blue. For most purposes you'll want to use a solid fill. As well as filling with flat colour, you can solid-fill an area with one of 32 different textures. The predefined textures include grids, fine checks and wavy-lines, but if you can't find the one you want you can define one of your own using edit texture. Over is the riskier proposition, but either kind of fill can 'escape' through the tiniest of gaps. Fortunately there is a wayof reversing a fill or any other kind of drawing operation that goes wrong. Of the various options across the top of the screen only one works immediately rather than offering you a pulldown of further choices. That option is Undo. The extra memory on the 6128 allows for certain luxuries, and Undo is one of them. Instead of keeping just one copy of your picture in memory the way most art programs do the copy you're working on, that is Art Studio keeps a spare one as well. Every time you switch drawing mode or perform some similar operation, Art Studio brings the spare copy up to date. This means that when you're halfway through performing a series of fills or whatever, Art Studio still knows what your picture looked like before you started filling. When you select Undo, the program restores your working copy to the same state as the spare. This spare copy of your picture isn't used just for Undo. It also makes possible the wash texture option on the Fill pulldown. This remarkable feature takes all the changes you've just made to the picture all the things that Undo would undo - and fills them with texture. This effectively allows you to paint, spray and draw with textures rather than solid colours. While you can't actually see the effect until you've selected wash texture, it remains a very powerful technique.
MAGNIFY Another benefit of the 6128's extra memory is the Magnify option. Rather than the small magnification window offered by most packages, Art Studio gives you a full-screen image. You can enlarge a given area of the screen by 2, 4 or 8 times. Simply select the appropriate enlargement factor from the Magnify pull-down, move the cursor (now shaped like a magnifying glass) to the area of your drawing which you want enlarged and press select'. The screen now fills with an enormous blown-up section of your picture. Though there's no normal-size image of the magnified area you're working on, you re unlikely to fcnd this a problem. The large window means that on >: 2 magnification you can see almost a full quarter of your picture - easily enough to see what you're doing to the picture as a whole. You can switch between the different enlargements without returning to the main menu. On x 8 there's an optional grid to make it clearer where one pixel one individual dot of colour ends and the next one begins. You're free to pan the Magnify window across the picture by pointing at and selecting the Macintosh-style 'scroll-bars'along the top and left edges of the window itself. You can make fine adjustments to the picture using any of the available colours, and undo them again if they don't look right. Every possible consideration is given to the keyboard-only user, with sensibly chosen keys to switch colours and pan the window. TEXT If there's a central theme to Art Studio it's thoroughness. Text entry, an afterthought in most packages, is given the fullest treatment you could ask for. You can use text in any of three widths and heights, combining them freely to get a wide range of shapes. Your text can run left to right or top to bottom, and the letters can be upright or sideways. There are also bold and italic options which can produce very useful if rather crude results. If you want to do anything more complex with text, the font editor option takes you into a whole new league. When you select font editor you're presented with a whole fresh screen dedicated to lettering styles. The full character set of the current font is displayed on the bottom half of the screen, while at the top there's a detailed view of the character currently being edited. You can scan through the character set, scroll an individual character or the whole font in any direction, make minute alterations to the current character or clear it and start from scratch. Several fonts are supplied on the Art Studio disk, and you can save modified versions of these or your own original fonts for later use. If you wanted to create foreign alphabets or scientific symbols for diagrams, you should find this very simple. Of course most people aren't going to bother with all this, but most packages wouldn't give you the option in the first place. WINDOWS Once you've created your picture you might well want to make large-scale alterations to it. The Windows pull-down offers a strong set of special effects based on the idea of a window' - a rectangular area of the screen defined by stretching a rubber box' round it. Windows can be copied, moved or cleared. They can be rotated through 90, 180 or 270 degrees, mirrored horizontally or vertically, and stretched or squashed in either direction. You can use a wmdow like a paint-brush with the 'smear' option, or merge it with the previous contents of the area you're copying it to. There's also an option to 'exclude' one colour, typically the Windowing needn't involve moving an area of the screen around. The swap inks and change ink options allow you to alter the colours of a windowed area, and are particularly powerful for creating special effects. Everything possible is done to reduce the effort needed in defining windows. You can define the whole screen as a window simply by selecting whole screen from the pull-down, or redefine the previous window using last window. If you want to make several copies of the same thing you can set the copying mode to 'multiple'. This means that Art Studio automatically redefines the last window after each operation on it, cutting in half the amount of selection you have to do. FINISHING TOUCHES The file-handling and printer-dump options show the thoroughness and ease of use characteristic of the program as a whole, rhe printer option is particularly well thought out, with just about every feature you could ask for to cope with the quirks of different printers. The manual is excellent, though you probably won't find you need to refer to it all that often. For most people its chief function will be to point out all the many excellent features which you could otherwise easily miss. The program is so natural and self-explanatory that you can work out most of the main features just by sitting down and using it. VERDICT Of all the many art packages available for the Arnold, this has to be the best. The only real shortcomings are the lack of a mode-0 facility and the need for a 128K system; Lenslok is an additional annoyance. These are far outweighed in my book by the enormous power, ease of use and attention to detail which are visible in every aspect of the system. While Art Studio is easy to operate from the keyboard - you can even define your own keys if you like - or a joystick, plugging in an AMX or Kempston Mouse turns it into an absolute joy. An awful lot of packages use icons and pull-downs just to be fashionable but Art Studio makes them earn their keep. If you're after an art package that feels natural, gives good results quickly and that you won't outgrow, Art Studio must be the one. AA#14 |
|  |


